
What is the PageSpeed Score with the Divi Theme anyway?
PageSpeed Score is a term used in search engine optimization, or SEO for short. And specifically the technical SEO. The PageSpeed Score indicates how well your page is optimized in the technical area, so that on the one hand the search engines can evaluate your page well and on the other hand how long the page takes to load for the user, how the adaptation to the various devices such as desktop, tablet, phone etc. is executed, i.e. everything technical.
SEO is crucial for the success of your web project. Many people always say content is king. That is true and there is no way around it. But if you make the effort to research and implement very good content, then go the whole way and help the search engines to better evaluate your content. Because in the end, you always help yourself since your rankings get better.
Almost 3 years ago I had reached 100% in every area in PageSpeed Score on GTmetrix with my site here, which is also powered by the Divi Theme. I haven’t changed anything in the meantime, but now I only get 87% in performance and 96% in structure via GTmetrix.
By the way, be aware that when you measure, you will always get slightly different values from all providers. To have a meaningful value you have to do it several times, best with a little time in between.
Time to change something. For the server part I show here the customizations with Plesk Obsidian. Under cPanel there should be equivalent possibilities.
BONUS: Below I have included a “mu-plugin“ that can be taken to rewrite the paths in the database from “jpg, JPG, jpeg, JPEG, png, PNG, gif and GIF” to “webp”. It works for the media library and posts, pages, products etc. in single blogs or for networks.

Starting from scratch
In order to make this article as beneficial as possible for many people, I will first switch off all previous optimizations and start completely from scratch. Just try to implement as much as you can. Every single step is important. I indicate everywhere exactly how I did it and which settings I use. It doesn’t matter if you already know the subject or not. Take a closer look. It is worthwhile for you. Enough with the words, let’s start..

Choose the right hosting provider
The most important first step is to look for a good hosting provider. In my case I use the VPS High RAM Tariff (10 vCPU, 32 GB RAM, 800 GB NVMe SSD) from Hosteurope with Linux Ubuntu. I administer it myself with Plesk Obsidian. Although this is very easy if you learn a little about it, not everyone wants to do this. For that, I’ll share Elegant Themes’ recommendations on hosting providers here. Very often you also read about WP-Engine. In that case, you’ll have to try it out for yourself.
What to look for in hosting? From the hardware point of view, as much RAM as possible, good CPU’s and definitely SSD hard drives.
Huh.. What means reverse proxy?
Apache Server vs. NGINX. Apache is great for handling dynamic code, such as PHP. WordPress is written in PHP. NGINX, on the other hand, is great for delivering static files like images, scripts, styles, etc. To get the best out of both servers, you put NGINX as a so called reverse proxy in front of Apache. This way static files are sent from NGINX to the user and dynamic requests are passed on to Apache.
To check if NGINX is installed under Plesk, open the console in the terminal and enter the autoinstaller with the following command:
:~# /usr/local/psa/admin/bin/autoinstaller
↵ (Enter)
Go forward with “F” until this view appears:

Type “2” and press the Enter key. Then type “F” again. After that you should get the following view:

Type in the number before “Web hosting”, in my case 13. Then you get the following overview. If there is no equal sign between the brackets before “Nginx web server”, the service still needs to be installed.

Then in Plesk go to “Tools & Settings” and there to “Services Management”. Check if the service “Reverse Proxy Server (nginx)” is enabled.

In Plesk you now go to your domain and there to “Hosting & DNS”. There you select “Apache & nginx Settings”. Remember this setting area. We need it again and again.

Set it the way you see it here:

Index files
index.php index.html index.htm
Additional directives for HTTP
AddOutputFilterByType BROTLI_COMPRESS text/html text/plain text/xml text/css text/javascript application/javascript
Additional directives for HTTPS
AddOutputFilterByType BROTLI_COMPRESS text/html text/plain text/xml text/css text/javascript application/javascript
Additional nginx directives
include mime.types;
types {
	application/x-font-ttf    ttc ttf;
	application/x-font-woff   woff;
	application/x-font-woff2  woff2;
	image/webp                webp;
	image/x-icon              cur ico;
}

gzip on;
gzip_http_version 1.1;
gzip_vary on;
gzip_comp_level 6;
gzip_proxied any;
gzip_types text/plain text/html text/css application/json application/x-javascript text/xml application/xml application/xml+rss text/javascript application/javascript text/x-js image/svg+xml application/vnd.ms-fontobject application/x-font-ttf font/opentype;
gzip_buffers 16 8k;
gzip_disable "MSIE [1-6]\.(?!.*SV1)";

brotli on;
brotli_comp_level 6;
brotli_static on;
brotli_types application/atom+xml application/javascript application/json application/rss+xml application/xml+rss text/x-js application/vnd.ms-fontobject application/x-font-opentype application/x-font-truetype application/x-font-ttf application/x-javascript application/xhtml+xml application/xml font/eot font/opentype font/otf font/ttf font/woff font/woff2 font/truetype image/svg+xml image/vnd.microsoft.icon image/x-icon image/x-win-bitmap text/css text/javascript text/plain text/html text/xml application/manifest+json;

location ~* \.(?:manifest|appcache|html?|xml|json)$ {
	expires -1;
}

location ~* \.(?:rss|atom)$ {
	expires 1h;
	add_header Cache-Control "public, no-transform";
}

location ~* \.(?:jpg|jpeg|gif|png|webp|ico|cur|gz|svg|svgz|mp4|ogg|ogv|webm|htc|ttf|ttc|otf|eot|woff|woff2|font.css)$ {
	add_header 'Access-Control-Allow-Origin' '*';
	expires 365d;
	access_log off;
	add_header Pragma public;
	add_header Cache-Control "public, no-transform";
}

location ~* \.(?:css|js)$ {
	add_header 'Access-Control-Allow-Origin' '*';
	expires 365d;
	access_log off;
	add_header Pragma public;
	add_header Cache-Control "public, no-transform";
}
PHP Version
The next important step is to activate as recent a version of PHP as possible. PHP is a dynamic scripting language and WordPress is written in it. Every new version brings better performance, so an important reason to be up-to-date. Now that I’m writing the blog, PHP is up to date in version 8.2.
We go to the terminal again and look under “PHP interpreter versions” in the Plesk settings:

Then we open the hosting settings of the domain:

Now select your PHP version and set “FPM application served by nginx”:

Then we configure PHP itself:

You can use this as a guideline:

Set the memory limit to at least 256M. If you run a store with WooCommerce etc., set it even to 512M. Make sure that “opcache.enable” is set to “on”.
Enable HTTP/2
The Internet is based on the HTTP protocol. Since 2015, the specifications of HTTP/2 have been published and are now also generally supported. Even though HTTP/3 is on target, it is not recommended to use it yet, because it cannot be used in all browsers yet.
Here at KeyCDN you can check if HTTP/2 is already enabled on your server. If you do not administer your server yourself, ask your hoster to enable it. If you can’t, change your hoster. To enable HTTP/2 in Plesk, enter the following command in the terminal:
:~# plesk bin http2_pref enable
↵ (Enter)

Redis
While we’re at the server, let’s install Redis. Redis is an advanced caching mechanism. If you are interested, feel free to read up on it. At this point, we’re just going to install it so we can use it later.
Since Docker is now natively supported in Plesk, we use Docker and save the setup on the server itself. Use the Docker search for:
bitnami/redis

Here are the settings. You just need to generate a secure password:

Redis Bitnami
Container name: redis
Volume mapping:   /bitnami    /var/redis
PATH: /opt/bitnami/common/bin:/opt/bitnami/redis/bin:/usr/local/sbin:/usr/local/bin:/usr/sbin:/usr/bin:/sbin:/bin
HOME: /
OS_ARCH: amd64
OS_FLAVOUR: debian-10
OS_NAME: linux
APP_VERSION: 6.2.7
BITNAMI_APP_NAME: redis
ALLOW_EMPTY_PASSWORD: no
NAMI_PREFIX: /.nami
BITNAMI_PKG_CHMOD: -R g+rwX
REDIS_MASTER_PORT_NUMBER: 6379
REDIS_PASSWORD: Your_Password
REDIS_MASTER_HOST: 172.17.0.2
Depending on which system you have, the settings can be different. In case of doubt, ask your hoster. That was it for now with the server. By the way, you can check here if the instructions for Apache and NGINX are valid and GZIP and Brotli are active.
This makes the results look better after all. And so far, these were only actions on the server itself.

Check "Divi – Forms GDPR Overlay" on the Elegant Themes Marketplace
“Divi – Forms GDPR Overlay” is available on the Elegant Themes Marketplace. Buy it once and use it in all your projects.
Plugin Organizer
My main page is a page in a network. On the other pages I administrate demo pages, support pages etc. This means that in principle there are more plugins installed than you need on the single page. This is where a savior in need comes to the rescue.
Plugin Organizer allows you to disable plugins to pages, for post types, categories, etc. And that where they are not needed. This prevents unnecessary calls and unnecessary scripts and styles and HTML in the finished page.
Here, the settings definitely depend on what extensions you have installed. I always try to use as few as possible and write the scripts myself if needed. However, I also do not always reinvent the wheel and this is how the “Plugin Filter” for my home page looks like.

From the structure it is simply explained. You give it a name and assign the links for which it should work. Then you can set with “Also Affect Children” if it should also work below the parent directory. For example, if you create one for “domain.com/wp-admin” and choose this setting, it will affect your entire backend. Priority comes into play when several filters act on one URL, which can be the case in a more complex environment. This way we make sure that nothing unnecessary is loaded.
To use the filters in this way, set the settings page as follows:

Divi Theme Options – Performance
Next we take care of the assets like styles, scripts, fonts etc. Divi has done a lot for this in the past versions, like dynamic styles and scripts and even critical css.
But what does that mean? With the “Dynamic Module Framework”, “Dynamic CSS”, “Dynamic JavaScript Libraries”, only the styles and scripts for the modules that are used are loaded. Which of course has a very good effect on the size of the resulting sources. Useful in any case.
With Critical CSS, only those styles are loaded in the “head” area of a web page that are needed for the so-called “above the fold” rendering. Above the fold is everything you can see directly in the viewport without scrolling. Also very useful.
Let’s see how this works:

This brings us to 82%, which does not convince me personally at this point.

Especially since the item “Eliminate render-blocking resources” is still quite present. This means that Divi can take care of its own styles and scripts just fine, but not others, so we’d better take a solution provided just for that. In that case, let’s look at Autoptimize. Before we do that, let’s reset Divi’s settings a bit, as you can see in the following picture. And set in the Theme Options –> Builder –> Advanced –> Static CSS File Generation to “Disabled”.

Autoptimize for Styles and Scripts
We set the main settings page as follows:

The key here is that we set “Do not aggregate but defer?”. Until HTTP/2, the different scripts and styles were aggregated into one file each, if possible, because HTTP/1 supported only a few parallel downloads. This is different now.
HTTP/2 on the other hand is designed to perform many parallel downloads. Autoptimize helps us in that all scripts and styles that are not yet compressed are compressed before being sent to the browser. Defer means to move the delivery of the assets as far behind as possible.
Critical CSS
For the extraction of the Critical CSS I use the service CriticalCSS.com. There is still a free variant here. However, I don’t know how good the results are. With Critical CSS, you just type in the link and then click the button next to it to copy the CSS to the clipboard.

Before you use it look in the CSS code if there are links to images, fonts etc. and change the domain to your CDN domain. If you don’t have a CDN service yet, see below how to set it up. Then in the Critical CSS tab click on “Add New Rule“. In this case we use “Conditional Tag” and choose “is_front_page“, because we want to optimize the front page first.
This is how you will do it later with the other areas of your website. For individual pages, it is best to use “Path” and then use a partial section of the URL.
For “https://doimain.com/contact/” just use “/contact/”.
Then confirm with “Submit” and save the settings at the bottom left of the page.

Then go to the “Extra” tab and set the settings there as you can see here. If you want to use Google Fonts, disable it here anyway. I’ll show you below where to download them and how to embed them on your own server.

Async Javascript to defer Styles and Scripts
Then install the plugin “Async JavaScript” from the same author. Set the settings as you see it here:

Then it’s time to look at what this has brought us. But first we should reset the NGINX cache so we don’t see any corruption:

Then, in an Incognito window, reload the home page so that it is in the cache and check with GTmetrix what it looks like now:

That looks better now. The next point we will look at is the CDN, because this is still displayed as important in the GTmetrix evaluation, “Med-Low”. For this you install W3TC and activate it.
W3TC – CDN Settings and bunny.net
I personally use “bunny.net” as CDN Provider. They have a very good price ratio. If you want to know how to share the IP’s of “bunny.net” in Plesk, read my blog “Adding firewall rules in Plesk in bulk“. You have to do this so they don’t get blacklisted in Plesk the first time they pull all your data to make it available worldwide. Here in the gallery is the configuration of my domain:
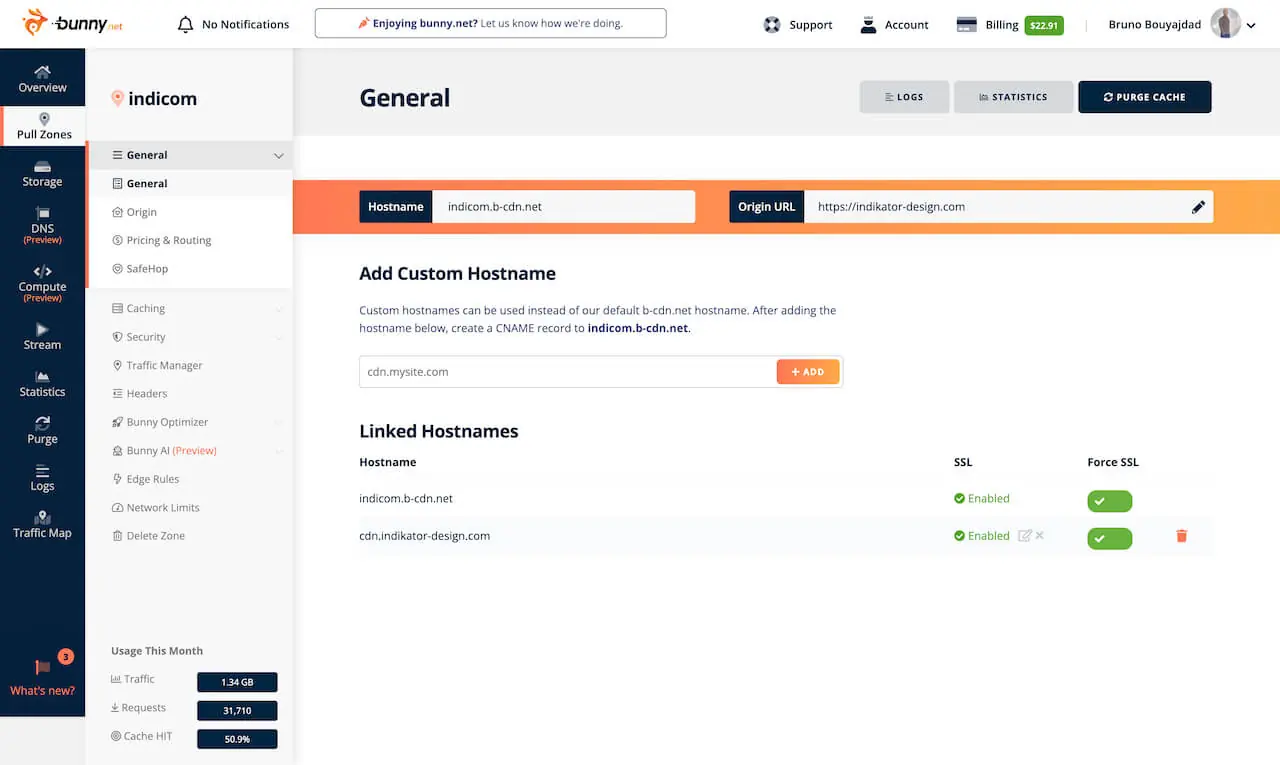


Now you have to enter the hostname in the DNS settings of your hoster. In my case I set “indicom.b-cdn.net” as CNAME for the subdomain “cdn.indikator-design.com”.
Now we go to the CDN settings section at W3TC:

Below you will find the complete settings as I do them here as a JSON file. If you don’t have Redis active, use “Disk: Enhanced” in the “General Settings” section as caching method.
We now go to the “General Settings” in the CDN section and check the box there and say save all settings. For all other options, make sure they are still turned off. They have to be configured first.
Then go back to the NGINX settings in Plesk and clear the cache again.
Then we look at the result in GTmetrix:

Lazy Load with “Divi – PageSpeed Booster”
Lazy what? Lazy Load describes a process where media is loaded only when it can be seen while scrolling and which is strongly recommended by Google. WordPress now does this for images and iframes. I’ve written a plugin specifically for Divi for this, which also works with background images, videos etc.. It’s called “Divi – PageSpeed Booster“.
Check "Divi – PageSpeed Booster" on the Elegant Themes Marketplace
“Divi – PageSpeed Booster” is available on the Elegant Themes Marketplace. Buy it once and use it in all your projects.
Why does that make sense? If we look at the last GTmetrix report, at the very bottom a page size of 1.66MB is displayed, of which 1.29MB is only because of images.
However, as with the Critical CSS, these images are not needed at startup because they are not displayed in the viewport without having to scroll. And that’s exactly what my plugin does. It dynamically loads the images only when they are needed during scrolling.
I activate this now and set it as follows:

If you use iframes, YT or Vimeo videos, then enable the button for that.
Since a new plugin has been activated, W3TC now reports that the NGINX server must be reloaded. We do this under “Tools and Settings” –> “Services Management”:

To be on the safe side, also delete the NGINX cache. Then reload the page in the Incognito window.

Now the page size is down to 604KB, with only 218KB used for images. And the requests are down from 46 to 36. At least with “Structure” we see now already once the 100%.
But we still have ways to go. And here it is now important to understand that the closer we are to the 100%, the more difficult it is to get further.
As you can see, “Divi – PageSpeed Booster” does a good job here.
Because the closer you get to the 100%, the more you can focus on the small things that are not listed before, because the other construction sites are simply too big to make the small construction sites matter.
Time for Google Page Speed Insights.
Google Page Speed Insights

I will now only focus on the mobile part here, because the desktop area automatically participates.
What immediately catches the eye is the “Serve images in next-gen formats” section. What exactly this means is also stated directly: Image formats like WebP and AVIF often provide better compression than PNG or JPEG. A sore point. So now it’s time to convert the whole library.
There are plugins that do that. I prefer to take it into my own hands as I can better control the results. Initially, it is planned to solve it with an action in Photoshop and and then use tinyPNG to optimize it. This just has the background that I can continue to use the workflow when I upload new images and on top of that I have tried different services over the years and tinyPNG has always won.
No affiliate link, I think they are just great. So far, they have always offered the best file size with the best quality.
Furthermore, I have the exact settings in view with this workflow. The images in the library are already optimized. With the action in Photoshop I save them losslees to the WebP format which results in a file size about 500% higher without losses. This image is then optimized again and in tests this workflow worked best for me. But you can use any program and optimization service you like. Just compare for yourself what works best.
By the way, this is the time when you should create a backup for the files and the database.
After that it’s time for the terminal. Go to the “wp-content” folder of your site and type the following:
:~# cd /var/www/vhosts/package/root_folder/wp-content/
↵ (Enter)
// Go to folder

:~# zip -r uploads.zip uploads/
↵ (Enter)
// Zip the folder
Then open your FTP client and download the zip file. And really do it exactly like this. When you download the uncompressed folder, get your retirement application ready. Depending on the size, it will take forever.
Now go through the directory and see which subfolders there are. Make notes which images should be exchanged. In any case all in the media library and in the posts and pages and if you use WooCommerce from your products. Otherwise think about where which folders of plugins are used. Does it make sense to swap the images or not?
Now there are 2 ways and that is also one of the reasons for this workflow:
- Convert and replace all existing images
- Convert all existing images and add them additionally
Since WebP is now very widespread according to Caniuse, I now clean up properly and choose option one. But that depends on your target audience and which browsers they use.
Preparation of the upload folder
You don’t delete anything cause you think it won’t be needed, because you upload this folder as a zip later and replace the existing one. So everything is needed.
I now go through each folder one by one and pull the images that are converted into a 1st intermediate folder for each. The rest like videos etc. I leave where they are. On this 1st intermediate folder I run a PS Action in bulk over it (or whatever mechanisms to convert the images) and get the converted images in a 2nd separate folder. Then it’s up to you guys. I just copy the images from the 2nd folder to the original folder. If you want to keep the original images to integrate a mechanism that primarily delivers WebP and falls back to the originals in case of emergency, then you also have to drag the images from folder 1 into the original directory. If you do this, consider whether you want to optimize the images from folder 1 beforehand as well.
I have added the mechanism with the fallback below.
Moving the files can be quite time-consuming depending on their size. You can save the time again with the terminal. On the Mac this is quite simple. Open the terminal and type “cd ” and drag the target folder with the mouse to the terminal. This enters the complete path there. Then hit Enter. Then type the following command:
:~# mv *.{png,jpg,jpeg,gif} (drag target folder here or type the path)
↵ (Enter)
If a file extension is not found, there will be an error message:
zsh: no matches found: *.gif
Then you have to take away this extension in the curly bracket and run it again, otherwise it won’t work.
Depending on how you want to proceed, the question now is what to do. If you want to use tinyPNG there are 2 possibilities. You get the Photoshop plugin which makes sense for many files or you get the Pro access for $39 a year. With this you can use the online platform in the logged in state for images without limit. Only 75MB size they may not exceed for a single image.
If you use the plugin, create an action that converts your images to the new format and then optimizes them with the plugin, or separate actions that you can run in bulk over a folder each.
Otherwise, use an action or other program to convert the images from the source folder to the destination folder and upload them to tinyPNG. You can do this with a lot of images. Up to 1000 are no problem from experience. More I have not tried yet.
Then copy the images back to the original folder.
cwebp – Here is how I did it in the end
The creation of WebP is based on Google and they offer a pretty strong command line tool that can be used to do the conversion very well, since the quality is very good as expected and it’s fast: cwebp.
It is available on Linux, Windows or macOS. On macOS I didn’t even have to install it.
Here it is about the conversion and simultaneous compression from folder 1 to folder 2. To do this go with the terminal into folder 1 via “cd /path/to/folder/”.
Normally only one image can be converted with cwebp. But with a small bash script it works in bulk:
:~# for file in *.{png,jpg,jpeg,gif} ; do cwebp -q 75 -alpha_q 100 -mt -m 6 -f 50 "$file" -o "/path/to/output/folder/${file%.(png|jpg|jpeg|gif)}.webp"; done
↵ (Enter)
The quality here is 75, multi-threading is used when possible, with the best compression method and a good filtering. Furthermore the respective extension is taken away and exchanged with “webp”.
Important note: For example, if you don’t have GIF files, then you need to remove “gif” in the first statement. Otherwise the script will not be executed. Start with all extensions first. If something is not present and an error message appears in the terminal, remove it until the script runs.
In total the “uploads” folder has shrunk from 389MB down to 137,8MB. That was worth it in any case. Not only do the pages themselves load faster, but it also reduces bandwidth consumption at the hoster, CDN etc.
WebP first and the old images as fallback
Here now the fallback mentioned above. If you don’t want to remove your images completely and replace them with WebP, then you load your converted images additionally with the images from folder 1 into the corresponding directories.
If you do it like me, then you have only the converted images in the directories, so still the ones from folder 2.
Now you rename the folder from “uploads” to “uploadsx“. Then you zip it. Either with one of your programs or on the Mac again with the terminal:
:~# zip -r uploadsx.zip uploadsx/
↵ (Enter)
Then upload it to the “wp-content” folder. There unzip it with “unzip uploadsx.zip”.
Now you have the two folders next to each other and leave them like this for now.
If you want to use the fallback now, you need the following instructions for Apache and NGINX. Remember the settings page where you wrote the directives before.
NGINX:
# http
map $arg_no_webp $no_webp{
	default "";
	"1" "no_webp";
}
#http
map $http_accept $webp_suffix{
	default "";
	"~*webp" ".webp";
}
#server
location ~* ^/.+\.(png|gif|jpe?g)$ {
	add_header Vary Accept;
	try_files $uri$webp_suffix$no_webp $uri =404;
}
Apache:
	AddType image/webp .webp


	RewriteEngine On
	RewriteCond %{HTTP_ACCEPT} image/webp
	RewriteCond %{REQUEST_FILENAME} "/"
	RewriteCond %{REQUEST_FILENAME} "\.(jpg|jpeg|png|gif)$"
	RewriteCond %{REQUEST_FILENAME}\.webp -f
	RewriteCond %{QUERY_STRING} !no_webp
	RewriteRule ^(.+)$ $1\.webp [NC,T=image/webp,E=webp,L]
Now to the other option of exchanging the images.
Search Replace DB – Or better not?
In my case I would like to use Search Replace DB. There are also plugins with which you can do this. But the less plugins the better and the script can simply be deleted later. And unfortunately, we can’t handle normal searches, they might cause too much trouble. More about that in a moment.
Download the ZIP and upload it via FTP directly into the “Root Folder“, the same directory where the “wp-contents” folder etc. is located.
Go to the folder via terminal and type in:
:~# unzip Search-Replace-DB-master.zip
↵ (Enter)
Delete the ZIP file directly and rename the corresponding folder to something unique. Then open “your-domain.com/unique-name/”, enter your data for the database as you have stored it in the “wp-config” and search for “.jpg” and replace it with “.webp“. Then start a test attempt:

In my case, there are a lot of tables, because it is a network. Now there are differences in the approach here. In a normal network the structure of the media is “wp-contents/uploads/sites/ID”. Where ID stands for 1, 2, 3 etc. and represents the ID of the respective blog.
There is a useful snippet here that you can add to the “functions.php” file in the “wp-content/mu-plugins” folder. So you can see in the network overview which blog has which ID:
Show Blog ID's in WP Network Overview
class Add_Blog_ID
{
public function __construct()
{
add_action( 'admin_footer', [ $this, 'add_style' ] );
add_filter( 'wpmu_blogs_columns', [ $this, 'get_id' ] );
add_action( 'manage_sites_custom_column', [ $this, 'add_columns' ], 10, 2 );
add_action( 'manage_blogs_custom_column', [ $this, 'add_columns' ], 10, 2 );
} // end __construct
public static function init()
{
$class = __CLASS__ ;
if ( empty( $GLOBALS[ $class ] ) )
$GLOBALS[ $class ] = new $class;
} // end init
public function add_columns( $column_name, $blog_id )
{
if ( 'blog_id' === $column_name )
echo $blog_id;
return $column_name;
} // end add_columns
// Add in a column header
public function get_id( $columns )
{
$columns['blog_id'] = __('ID');
return $columns;
} // end get_id
public function add_style()
{
echo '';
} // end add_style
} // end class
add_action( 'init', [ 'Add_Blog_ID', 'init' ] );
However, I have implemented an exception on my end. I use a shared media library for all blogs on my main site, which makes sense here since it’s the main site, demo sites and support area. In a network with different users it makes no sense. To manage this, there is a useful script here on Github: WP Multisite Media Library Sync.
Depending on how your upload folder is configured, now it means to bring all images there into the new format “webp”. In this case all images with the extensions: “jpg”, “jpeg”, “png” and “gif”. If you have other formats, then check if it makes sense to change them.
If you look at the results of the test run, you will see other entries to watch out for:

i:169;s:9:"mime-type";s:10:"image/jpeg";
Overall, I discovered the following values to replace:
.jpg --> .webp
.jpeg --> .webp
.JPG --> .webp
.JPEG --> .webp
.gif --> .webp
.GIF --> .webp
.png --> .webp
.PNG --> .webp
image/jpeg --> image/webp
But what about “Jpeg” etc. ? And another problem which can arise is at the point that a search and replace with e.g. “.jpg” on “.webp” makes no sense, because that can backfire quite a bit. Imagine you have somewhere a configuration of a form where you can upload different file extensions.
This could look like “.. .jpg .jpeg .png …” or “.., .jpg, .jpeg, .png, …”. Or you reference images that are on another server etc. All these configurations would be obsolete and the effort to set up everything again would be immense.
Regular Expressions
In this case it simply makes sense to work with Regular Expressions. For further information I have written a blog here: Extended Regular Expressions
That’s why I wanted to perform it with “Search and replace DB” at first, because it allows that. The following problem could be solved well:
Paths starting with “/wp-content/uploads/” and ending with “jpg, jpeg, png and gif”, each case insensitive:
#(?<=\/wp-content\/uploads\/)([^\"\']+\.)(jpeg|jpg|png|gif)(?=[\"|\'])#/i
--> $1webp
Just means, start with “/wp-content/uploads/” but ignore it in the matches, then all characters except ” or ‘ with a dot in front of “jpeg, jpg, png or gif” with a trailing ” or ‘ which are also ignored in the matches.
The problem is in the meta values. In the “meta_value” column, for “_wp_attachment_metadata” the structure is as follows:
a:5:{s:5:"width";i:1280;s:6:"height";i:720;s:4:"file";s:60:"wordpress-development-javascript-on-mac-indikator-design.jpg";s:5:"sizes";a:10:{s:9:"thumbnail";a:4:{s:4:"file";s:68:"wordpress-development-javascript-on-mac-indikator-design-150x150.jpg";s:5:"width";i:150;s:6:"height";i:150;s:9:"mime-type";s:10:"image/jpeg";}s:6:"medium";a:4:{s:4:"file";s:68:"wordpress-development-javascript-on-mac-indikator-design-300x169.jpg"; ...
And although it says in the explanation of “Search Replace DB” that they can work with serialized data, the following regex has no effect.
#(?<=\.|\/)(jpg|jpeg|png|gif)(?=\")#/i
--> webp
Unfortunately, this is also ignored here, which makes it difficult to handle the expected results:
#(?<=\.|\/)(jpg|jpeg|png|gif)$#/i
--> webp
At least nothing is displayed in the results during the test and cannot be checked. Furthermore, I have seen that the script does not handle slashes “/” in a regex. This is simple to fix in the script but who knows what is still waiting. And you can also select only isolated tables, but not further refine the selection there.
Time to write a script myself..
And don’t take it the wrong way. The script is great for domain moves, where I always take it. But here in the case we need better fine tuning.
MU-Plugin: Rewriting the database entries
First the question where it makes sense? I think in the beginning the images in the media library and the image links in the posts should be enough. For this we have to take into account that under Posts all posts are listed, like those from the media library itself, from blogs, from pages, WooCommerce products, etc. I won’t go into more detail about Custom Post Types at this point. You can solve this yourself with the script, which I link below.
I write it as a single PHP file as “mu-plugin”, simply because it only needs to be used once. It works for single blogs and for networks.
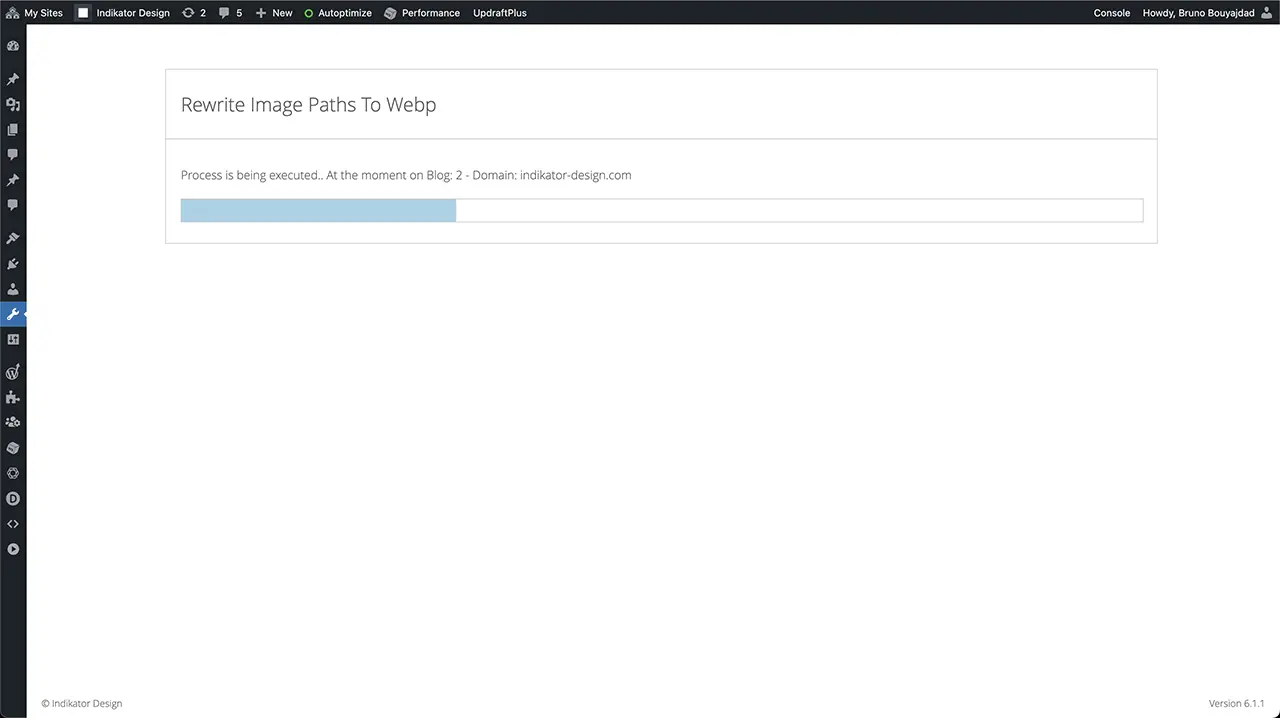
In the network, the script is completed after each blog and via Ajax the next blog is started in a new call. So there should be no problems with the maximum execution times in PHP for large networks.
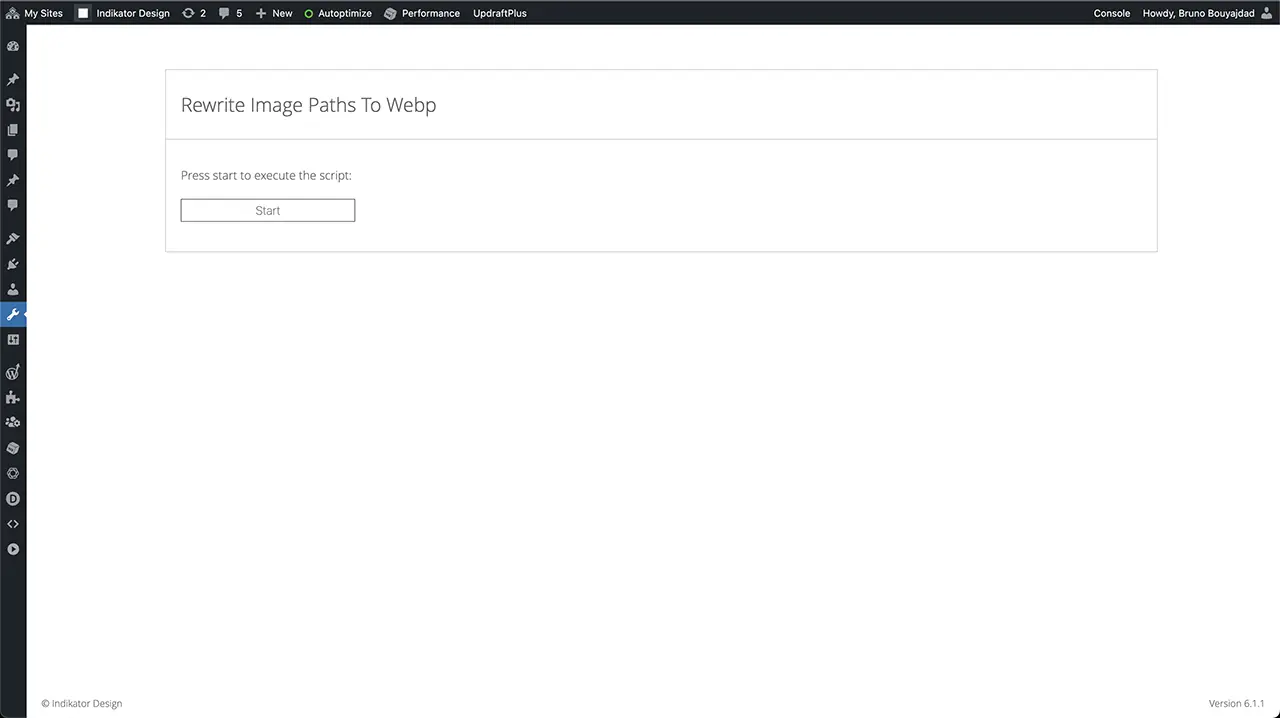
MU-Plugin: Rewrite JPG, JPEG, PNG, GIF to WEBP
<?php
/*
Plugin Name: Rewrite JPG, JPEG, PNG, GIF to WEBP
Plugin URI: https://indikator-design.com/get-divi-theme-to-100-in-your-pagespeed-score/
Description: Rewrite image extensions from images in mediathek and linked in posts.
Version: 1.0
Author: Bruno Bouyajdad | Indikator Design
Author URI: https://indikator-design.com
Author Email: contact@indikator-design.com
*/
/**
* Do not allow direct access
*
* @since 1.0
*/
if ( ! defined( 'ABSPATH' ) ) die( 'Nothing to find Ma\'am..' );
/**
* Add the Menu Page
*
* @since 1.0
*/
if ( ! class_exists( 'rwwebpControllerMenu' ) )
{
final class rwwebpControllerMenu
{
/**
* Constructor
*
* @since 1.0
*/
public function __construct()
{
add_action( 'admin_menu', [ $this, 'addMenu' ] );
} // end constructor
/**
* Add menu in admin area
*
* @since 1.0
*/
public function addMenu()
{
$hook = add_submenu_page
(
'tools.php',
'Rewrite WEBP',
'Rewrite WEBP Execution',
'manage_options',
'rewrite-webp',
[ $this, 'menuCallback' ],
10
);
} // end implement
/**
* Menu Callback
*
* @since 1.0
*/
public function menuCallback()
{
( new rwwebpViewExecution )->render();
} // end menuCallback
} // end rwwebpControllerMenu
} // end if
new rwwebpControllerMenu;
/**
* Execute the Ajax Request
*
* @since 1.0
*/
if ( ! class_exists( 'rwwebpControllerAjax' ) )
{
final class rwwebpControllerAjax
{
/**
* Define properties
*
* @since 1.0
*/
private $transient;
const ACTION = 'rwwebp_execute_rewrite';
/**
* Constructor
*
* @since 1.0
*/
public function __construct()
{
$this->transient = 'rwwebp_list_blog_ids';
add_action( 'wp_ajax_' . self::ACTION, [ $this, 'ajax' ] );
} // end constructor
/**
* Execute the ajax call
*
* @since 1.0
*/
public function ajax()
{
$p = $_POST;
if ( empty( $p['nonce'] ) || empty( $p['blog'] ) || empty( $p['blogs'] ) )
$this->result( 'error' );
if ( wp_verify_nonce( esc_attr( $p['nonce'] ), self::ACTION . '_nonce' ) ) :
if ( ! is_multisite() ) :
$blogToExecute = esc_attr( $p['blog'] );
( new rwwebpControllerDB( new rwwebpModelDatabase( $blogToExecute ) ) )->initialize();
else :
if ( ! ( $transientBlogs = get_site_transient( $this->transient ) ) ) :
foreach ( $p['blogs'] as $oneBlog )
$transientBlogs[ (int) esc_attr( $oneBlog ) ] = false;
endif;
$blogToExecute = (int) esc_attr( $p['blog'] );
if ( ! $transientBlogs[$blogToExecute] ) :
$currentBlog = (int) get_current_blog_id();
$blogChange = ( $blogToExecute != $currentBlog );
if ( $blogChange )
switch_to_blog( $blogToExecute );
( new rwwebpControllerDB( new rwwebpModelDatabase( $blogToExecute ) ) )->initialize();
if ( $blogChange )
switch_to_blog( $currentBlog );
$transientBlogs[$blogToExecute] = true;
endif;
foreach ( $transientBlogs as $blog => $bool ) :
if ( ! $bool ) :
$notDelete = true;
break;
endif;
endforeach;
// delete as update doesn't work well
delete_site_transient( $this->transient );
if ( isset( $notDelete ) ) // just if still needed
set_site_transient( $this->transient, $transientBlogs, DAY_IN_SECONDS * 7 );
endif;
$this->result( 'success' );
endif;
$this->result( 'error' );
} // end ajax
/**
* Ajax error handler
*
* @since 1.0
*/
private function result( $case )
{
$obj[$case] = true;
echo json_encode( (object) $obj );
wp_die();
} // end error
} // end rwwebpControllerAjax
} // end if
new rwwebpControllerAjax;
/**
* Database Controller to execute the changes
*
* @since 1.0
*/
if ( ! class_exists( 'rwwebpControllerDB' ) )
{
final class rwwebpControllerDB
{
/**
* Define properties
*
* @since 1.0
*/
private $posts;
private $modelDB;
/**
* Constructor
*
* @since 1.0
*/
public function __construct( rwwebpModelDatabase $modelDB )
{
/**
* Set properties
*
* @since 1.0
*/
$this->modelDB = $modelDB;
$this->images = $this->modelDB->getIds( '' );
$this->posts = $this->modelDB->getIds( 'post' );
} // end constructor
/**
* Initialize the class
*
* @since 1.0
*/
public function initialize()
{
$this->posts();
$this->attachments();
} // end initialize
/**
* Execute the posts
*
* @since 1.0
*/
public function posts()
{
foreach ( $this->posts as $post ) :
$content = $this->postLinks( $this->modelDB->getPostContent( $post->ID )[0]->post_content );
$this->modelDB->setPostContent( $post->ID, $content );
endforeach;
} // end posts
/**
* Execute the attachments
*
* @since 1.0
*/
public function attachments()
{
foreach ( $this->images as $image ) :
$image = $this->modelDB->getPost( $image->ID );
$update['ID'] = $image->ID;
$update['post_mime_type'] = $this->replaceMeta( $image->post_mime_type );
// The guid value is deliberately ignored:
// https://wordpress.org/support/article/changing-the-site-url/#important-guid-note
$this->modelDB->setPost( $update );
$fileKey = '_wp_attached_file';
$metaKey = '_wp_attachment_metadata';
$imageFile = $this->modelDB->getMeta( $image->ID, $fileKey );
$this->modelDB->setMeta( $image->ID, $fileKey, $this->replaceMeta( $imageFile ) );
$metaData = $this->modelDB->getMeta( $image->ID, $metaKey );
$this->modelDB->setMeta( $image->ID, $metaKey, $this->adjustMetaArray( $metaData ) );
endforeach;
} // end attachments
/**
* Adjust the meta data array
*
* @since 1.0
*/
function adjustMetaArray( $arr )
{
$arr['file'] = $this->replaceMeta( $arr['file'] );
foreach ( $arr['sizes'] as $key => $val ) :
$arr['sizes'][$key]['file'] = $this->replaceMeta( $val['file'] );
$arr['sizes'][$key]['mime-type'] = $this->replaceMeta( $val['mime-type'] );
endforeach;
return $arr;
} // end adjustMetaArray
/**
* Replace the extension from post content
*
* @since 1.0
*/
function postLinks( $content )
{
$regex = '#(?<=wp-content\/uploads\/)([^\s\"]+.{1})(jpg|jpeg|png|gif)#i';
return preg_replace( $regex, '$1webp', $content );
} // end postLinks
/**
* Replace the extension from meta
*
* @since 1.0
*/
function replaceMeta( $source )
{
return preg_replace( '#(?<=\.|\/)(jpg|jpeg|png|gif)$#i', 'webp', $source );
} // end replaceMeta
} // end rwwebpControllerDB
} // end if
// /**
// * Database Model to get and update images and posts
// *
// * @since 1.0
// */
if ( ! class_exists( 'rwwebpModelDatabase' ) )
{
final class rwwebpModelDatabase
{
/**
* Define properties
*
* @since 1.0
*/
private $blog;
private $wpdb;
private $post;
/**
* Constructor
*
* @since 1.0
*/
public function __construct( $blogToExecute )
{
global $wpdb;
/**
* Set properties
*
* @since 1.0
*/
$this->wpdb = $wpdb;
$this->blog = $blogToExecute;
$this->post = $this->getPostsTable();
} // end constructor
/**
* Get the attachment ids
*
* @since 1.0
*/
public function getIds( $type )
{
$post = 'post' == $type ? '!=' : '=';
$query = "SELECT ID FROM {$this->post} WHERE post_type {$post} 'attachment'";
return $this->wpdb->get_results( $query );
} // end getMediaIds
/**
* Get the post content
*
* @since 1.0
*/
public function getPostContent( $id )
{
$query = "SELECT post_content FROM {$this->post} WHERE ID = %d";
return $this->wpdb->get_results( $this->wpdb->prepare( $query, $id ) );
} // end getPostContent
/**
* Update the post content
*
* @since 1.0
*/
public function setPostContent( $id, $content )
{
return $this->wpdb->update( $this->post, [ 'post_content' => $content ], [ 'ID' => $id ] );
} // end setPostContent
/**
* Get the posts table
*
* @since 1.0
*/
public function getPostsTable()
{
$blog = ( 'single' == $this->blog ) ? '' : $this->blog . '_';
return $this->wpdb->base_prefix . $blog . 'posts';
} // end getPostsTable
/**
* Get a post by id
*
* @since 1.0
*/
public function getPost( $id )
{
return get_post( $id );
} // end getPost
/**
* Update a post by id
*
* @since 1.1
*/
public function setPost( $data )
{
wp_update_post( $data, true );
} // end setPost
/**
* Get the image meta data
*
* @since 1.0
*/
public function getMeta( $id, $key, $single = true )
{
return get_post_meta( $id, $key, $single );
} // end getMeta
/**
* Update the image meta
*
* @since 1.0
*/
public function setMeta( $id, $key, $value )
{
update_post_meta( $id, $key, $value );
} // end setMeta
} // end rwwebpModelDatabase
} // end if
/**
* Rewrite View Controller
*
* @since 1.0
*/
if ( ! class_exists( 'rwwebpControllerView' ) )
{
final class rwwebpControllerView
{
/**
* Define properties
*
* @since 1.0
*/
private $action;
/**
* Constructor
*
* @since 1.0
*/
public function __construct()
{
/**
* Set properties
*
* @since 1.0
*/
$this->action = rwwebpControllerAjax::ACTION;
} // end constructor
/**
* Get Site ID's
*
* @since 1.0
*/
private function getSiteIds()
{
if ( ! is_multisite() )
return [ [ 'single' ], [ $this->hostOrigin() ] ];
foreach ( get_sites() as $index => $site ) :
$blogIds[] = $site->blog_id;
$domains[] = $site->domain;
endforeach;
return [ $blogIds, $domains ];
} // end getSiteIds
/**
* Get the values for JS
*
* @since 1.0
*/
public function getProps()
{
$info = $this->getSiteIds();
return
[
'props' =>
[
'blogs' => $info[0],
'domains' => $info[1],
'action' => $this->action,
'ajax_url' => admin_url( 'admin-ajax.php' ),
'nonce' => wp_create_nonce( $this->action . '_nonce' ),
],
];
} // end getProps
/**
* Get the host origin
*
* @since 1.0
*/
private function hostOrigin()
{
$s = $_SERVER;
return isset( $s[ 'HTTP_HOST' ] )
? esc_attr( $s[ 'HTTP_HOST' ] )
: ( function() use ( $s )
{
if ( isset( $s['HTTP_ORIGIN'] ) ) :
$parse = parse_url( $s['HTTP_ORIGIN'] );
if ( isset( $parse['host'] ) )
return $parse['host'];
else
return false;
endif;
return false;
})();
} // end hostOrigin
} // end rwwebpControllerView
} // end if
/**
* Rewrite WEBP View
*
* @since 1.0
*/
if ( ! class_exists( 'rwwebpViewExecution' ) )
{
final class rwwebpViewExecution
{
/**
* Render the view
*
* @since 1.0
*/
public function render()
{ ?>
<!-- View Style -->
<style>
h1 {
padding-bottom: 0px;
}
h1, p {
color: #656565;
font-weight: 200;
font-family: Open Sans,Arial,sans-serif;
}
p {
font-size: 16px;
}
#wpwrap {
background-color: white!important;
}
.outer-container {
width: 80%;
margin: 60px 10% 10%;
border: 1px solid #ccc;
}
.head {
padding: 20px;
border-bottom: 1px solid #ccc;
}
.start {
margin-bottom: 20px;
}
.main {
padding: 20px;
min-height: 100px;
}
button.start {
font-weight: 200;
background: white;
color: #656565!important;
font-size: 16px!important;
border-radius: 0px!important;
padding: 5px 100px!important;
border: 1px solid #656565!important;
}
.progress {
width: 100%;
height: auto;
display: none;
}
.outer {
width: 100%;
height: 30px;
display: flex;
border: 1px solid #ccc;
}
.inner {
width: 0;
height: 30px;
margin-right: auto;
background-color: #a5d3e5;
}
#confetti-canvas {
top: 0;
position: fixed;
z-index: 1!important;
}
</style>
<!-- View -->
<div class="outer-container">
<div class="info-container">
<div class="head">
<h1>Rewrite Image Paths To Webp</h1>
</div>
<div class="main">
<p class="start">Press start to execute the script:</p>
<button id="start-process" class="start">Start</button>
<div id="progress" class="progress">
<div id="outer" class="outer">
<div id="inner" class="inner"></div>
</div>
</div>
</div>
</div>
</div>
<!-- JavaScript Rewrite Image Extensions Handler -->
<script>
(function($,w){$(function(){
class rewriteWebp
{
setProps()
{
this.props;
this.blogs;
this.multi;
} // end setProps
constructor()
{
this.setProps();
this.getPhpProps();
this.bindEvents();
} // end constructor
ajax( self = this )
{
const data =
{
nonce : self.props.nonce,
blogs : self.props.blogs,
action : self.props.action,
blog : self.blogs.shift(),
};
$( '#blog' ).html( 'single' == data.blog ? 1 : data.blog );
$( '#domain' ).html( self.props.domains.shift() );
$.ajax(
{
data : data,
type : 'post',
dataType : 'json',
url : self.props.ajax_url,
success: function( data )
{
if ( data.hasOwnProperty( 'success' ) )
{
if ( 0 == self.blogs.length )
{
if ( ! self.multi )
$( '#inner' ).css( 'width', '100%' )
$( 'p.start' ).html( self.finished() );
$( '#inner' ).css( 'backgroundColor', '#a7e5a5' );
return $.getScript( self.confetti(), function()
{
startConfetti();
setTimeout( () => { stopConfetti(); }, 5000 );
});
}
$( '#inner' ).css( 'width', self.progressWidth() + '%' );
self.ajax();
}
if ( data.hasOwnProperty( 'error' ) )
self.error();
},
error: function( data )
{
self.error();
}
});
} // end ajax
error()
{
$( 'p.start' ).html( 'Something did not work. Check your "debug.log" for errors and correct them. Then restart the script.' );
$( '#inner' ).css( { 'width': '100%', 'backgroundColor': '#b86969' } );
} // end error
getPhpProps()
{
this.php = <?php echo json_encode( ( new rwwebpControllerView )->getProps() ); ?>;
this.props = this.php.props;
} // end getPhpProps
bindEvents( self = this )
{
$( '#start-process' ).on( 'click', function( e )
{
e.preventDefault();
if ( confirm( self.confirm() ) )
{
$( this ).fadeOut( '10', function()
{
$( '#progress' ).fadeIn( '300', function()
{
self.blogs = self.props.blogs.slice();
self.multi = self.blogs.length > 1 ? true : false;
$( '#inner' ).css( 'width', ( self.multi ? self.progressWidth() : '33' ) + '%' );
$( 'p.start' ).html( self.start() );
return self.ajax();
});
});
}
});
} // end bindEvents
progressWidth()
{
let all = this.props.blogs.length;
return ( 100 / all ) * ( all - this.blogs.length + 1 );
} // end progressWidth
start()
{
return 'Process is being executed.. At the moment on Blog: <span id="blog"></span> - Domain: <span id="domain" />';
} // end start
confirm()
{
return 'If the process is started, it cannot be undone without an existing backup of the database. Are you sure you want to start now?';
} // end confirm
finished()
{
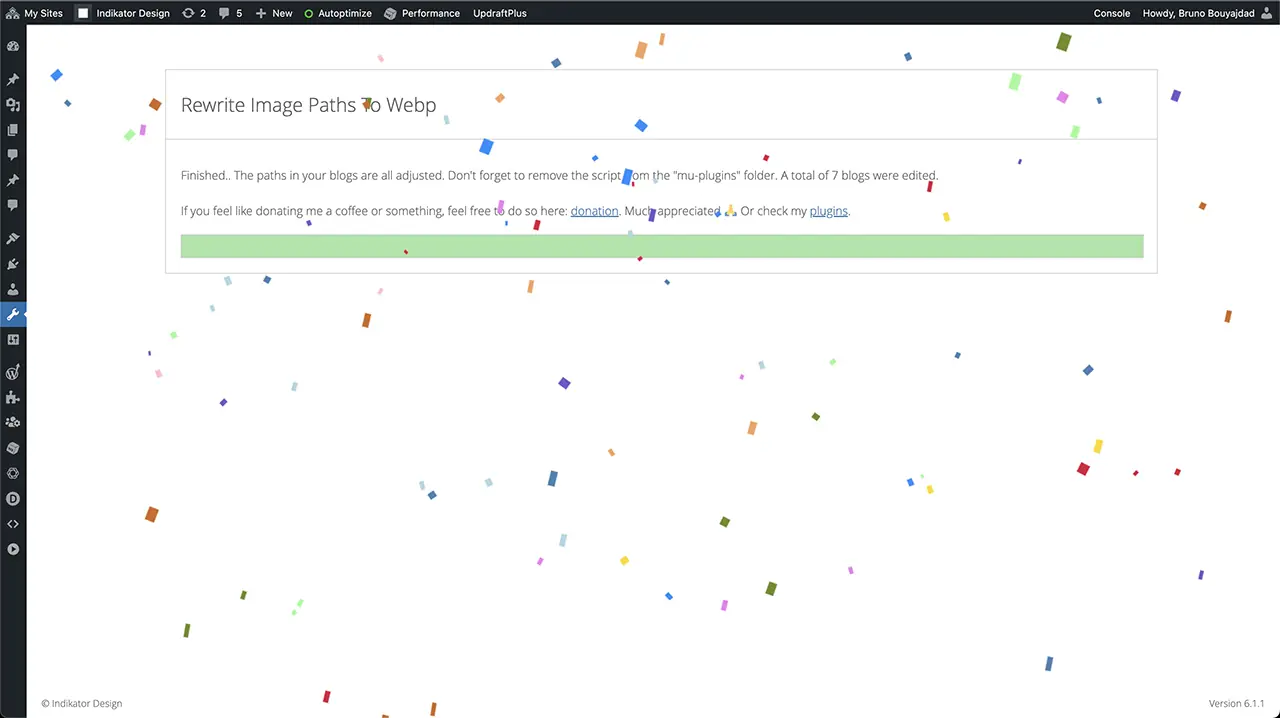
return 'Finished.. The paths in your blogs are all adjusted. Don\'t forget to remove the script from the "mu-plugins" folder. A total of ' + this.props.blogs.length + ' blogs were edited.<br><br>If you feel like donating me a coffee or something, feel free to do so here: <a href="https://www.paypal.com/donate/?hosted_button_id=YBQSPNKV7UYXA" target="_blank">donation</a>. Much appreciated 🙏 Or check my <a href="https://www.elegantthemes.com/marketplace/author/indikator-design/" target="_blank">plugins</a>.';
} // end finished
confetti()
{
// Just to celebrate. Check the code here: https://cdn.indikator-design.com/media/blogs/divi-to-100/confetti/confetti.js
return 'https://cdn.indikator-design.com/media/blogs/divi-to-100/confetti/confetti.min.js';
} // end confetti
} // end class rewriteWebp
new rewriteWebp;
});}(jQuery,window));
</script>
<?php } // end render
} // end rwwebpViewExecution
} // end if
You can also find the plugin on Github “Rewrite JPG, JPEG, PNG, GIF to WEBP” or download the final file to insert here: Rewrite JPG, JPEG, PNG, GIF to WEBP.
Let’s see what appears in PageSpeed Insights now:

Now the message with “ensure text remains visible” appears next. And that brings us to the Google Fonts and how to embed them on your own server.
Embed Google Fonts on your own server
When you embed Google Fonts the normal way, you reference their server “fonts.gstatic.com”. Inexplicably, this is exactly what is detected as an error in many measurements, because the cache times are not set correctly. Why this is the case could probably be discussed in more depth in a philosophy lesson, because it doesn’t have much to do with common sense anymore.
Apart from that, you usually bypass this today also for DSGVO reasons, because when a connection is established in which the Google Fonts are loaded via your page, a message goes to Google with the user’s IP and that raises questions in the European area that usually make lawyers earn good money and you have to pay for it.
So it makes sense to implement them on your own server, so that the call to Google itself is omitted. And that’s easier than you might think at first.
Create a subfolder “fonts” in your child-theme. Download your font from Google Fonts or another provider. In our example here, we’ll use the Open Sans font. It makes sense to adjust the name of the files to be able to assign them better later, because in CSS you work with “font-weight” 100, 200, 300 etc. But the filenames do not have this information.
- OpenSans-Bold.ttf
- OpenSans-ExtraBold.ttf
- OpenSans-Light.ttf
- OpenSans-Medium.ttf
- OpenSans-Regular.ttf
- OpenSans-SemiBold.ttf
In the overview at Google Fonts you can see the numerical values listed by the names.

In that case we change the file names as follows:
OpenSans-Bold.ttf –> os-700.ttf
OpenSans-ExtraBold.ttf –> os-800.ttf
OpenSans-Light.ttf –> os-300.ttf
OpenSans-Medium.ttf –> os-500.ttf
OpenSans-Regular.ttf –> os-400.ttf
OpenSans-SemiBold.ttf –> os-600.ttf
OpenSans-Italic.ttf –> osi.ttf
For Italic Style I use here only the regular style. And also only as an example. Think beforehand exactly what you actually use on the page and include only the fonts that you really need. You can also use different fonts like in the example.
After I see this, I just use:
OpenSans-Regular.ttf –> os-300.ttf
OpenSans-Bold.ttf –> os-400.ttf
OpenSans-Italic.ttf –> osi.ttf
Now load them into your “fonts” folder in child-theme. With this you get the link to a font:
“https://cdn.domain.com/wp-content/themes/theme-name/fonts/os-400.ttf”
We’ll now incorporate that into your CSS. To do this, open your main styling file. This can be the “style.css” in your root directory of the child theme or however you handle it.
For the 3 example files you enter the following directly at the top of the file:
@font-face {
  font-family: 'Open Sans';
  font-style: normal;
  font-weight: 300;
  src: local('Open Sans Light'), url("https://cdn.domain.com/wp-content/themes/theme-name/fonts/os-300.ttf") format('ttf');
}

@font-face {
  font-family: 'Open Sans';
  font-style: normal;
  font-weight: 400;
  src: local('Open Sans Regular'), url("https://cdn.domain.com/wp-content/themes/theme-name/fonts/os-400.ttf") format('ttf');
}

@font-face {
  font-family: 'Open Sans';
  font-style: italic;
  font-weight: 400;
  src: local('Open Sans Italic'), url("https://cdn.domain.com/wp-content/themes/theme-name/fonts/osi-400.ttf") format('ttf');
}
In fact, that’s about it. The fonts are now available. But there was still the matter with “ensure text remains visible” in PageSpeed Insights. For the sake of completeness, I’ll list both here. To do this, you change the instructions as follows:
@font-face {
  font-family: 'Open Sans';
  font-display: swap;
  font-style: normal;
  font-weight: 300;
  src: local('Open Sans Light'), url("https://cdn.domain.com/wp-content/themes/theme-name/fonts/os-300.ttf") format('ttf');
}

@font-face {
  font-family: 'Open Sans';
  font-display: swap;
  font-style: normal;
  font-weight: 400;
  src: local('Open Sans Regular'), url("https://cdn.domain.com/wp-content/themes/theme-name/fonts/os-400.ttf") format('ttf');
}

@font-face {
  font-family: 'Open Sans';
  font-display: swap;
  font-style: italic;
  font-weight: 400;
  src: local('Open Sans Italic'), url("https://cdn.domain.com/wp-content/themes/theme-name/fonts/osi-400.ttf") format('ttf');
}
It’s due to “font-display: swap;”. Additionally, we can even preload the fonts. For this we take the 3 links and join them with commas:
“https://cdn.domain.com/wp-content/themes/theme-name/fonts/os-300.ttf,https://cdn.domain.com/wp-content/themes/theme-name/fonts/os-400.ttf,https://cdn.domain.com/wp-content/themes/theme-name/fonts/osi-400.ttf”
Then we go to the “Extra” tab in “Autoptimize” and paste these links separated with commas into the “Preload specific requests” field.
Width and Height to images
Is the last critical aspect in PageSpeed Insights and refers to images within the image tag. Unfortunately, no HTML attributes can be inserted with Divi to the img tags directly. But we can solve this relatively easily with a small JavaScript snippet.
First of all, open the page in the browser and do it normally on the desktop. Go with the mouse over the image and via right click in the context menu on “Inspect Element“. Hover over the image and see with which values the image is rendered.

In my case it is “950×1426”. Now you give the image container an ID under the tab “Advanced“. Then you create a code module under the image. Here you also go to the tab “Advanced” and in the CSS box for the main element you set: display:none;
This way it won’t take up any space and won’t interfere with your styling. Then you enter the following snippet into the code field and exchange your ID and your image dimensions there:
(function($){$(function(){$('#me').find('img').attr({'width':'950px','height':'1426px'})});}(jQuery));
This adds the missing attributes.


All in all, this doesn’t look bad and at least comes close to 100% everywhere. For “Accessibility” the following header seems to be the driving problem:
content="width=device-width, initial-scale=1.0, maximum-scale=1.0, user-scalable=0"
I don’t know where it’s coming from at the moment, but will look into it further in the near future.
At this point it is important to extend the settings to all areas of the site as much as possible, so that the best possible scores are achieved everywhere.
Furthermore I now activate the “Page Cache“, “Database Cache” and “Object Cache” at W3TC under “General Settings” and disable NGINX cache in the hosting settings. If you not use Redis let it enabled and do not use “Page Cache”. But remember that when you make changes to the pages, you must clear the cache in the server settings.
All 3 caches in the settings are set to Redis. If you don’t have Redis active, set it to “Disk Enhanced”. The configuration for W3TC can be found here. You only have to change the configuration for CDN. If you have Redis active, go to the section “Page Cache”, “Database Cache”, “Object Cache” and enter the password you have set. If you don’t use NGINX, you must also enable “Browser Cache” in W3TC. You should be able to use all the settings. Just turn them on.
Some aspects in the improvement notes cannot be changed in principle. They are simply related to the use of Divi as a page builder and the underlying coding. With version 5, many things are supposed to get better. However, it can be seen here that a lot can already be done with reasonable effort.
Check also Seorch for the rest of your technical SEO like keyword density, whether the HTML hierarchy is correct etc.
Since the field of work here in the area is quite complex and new aspects are always being added, I will keep updating here. So come back and see what’s new. Or share your ideas and improvements here. Did I miss something? Are there better possibilities? Completely new ideas that aren’t even listed here yet? Share them and let’s work together to find the best way to get Divi even closer to 100%.
Final words for Divi and the ominous 100%
Divi inherently offers many options for optimization. But only with the use of some other tools you can get out everything that is currently possible. The effort is manageable and worth the effort in any case. Big players like Amazon etc. invest hundreds of millions of dollars in microsecond optimization, because they know that these investments pay off. Simply because the user experience is increased immensely and thus success can be scaled measurably. It takes a lot of time and effort to research and create good content. It’s worth it to go the distance and send the content to the user in the best possible way. And this is not a criticism, but simply well-intentioned, because it helps yourself and the success for your project.
If you want to buy me a coffee you can do it here. Thanks a lot 🙏 Or check my plugins.
Have you suggestions for improvements to this article? Just use the comment area below. Do you want support for implementation or do you need help elsewhere? You can book us. For this, simply use our contact form to get in touch with us.
Divi is a registered trademark of Elegant Themes, Inc. This website is not affiliated with nor endorsed by Elegant Themes.
Get the best out of your web!
Bruno Bouyajdad
Webentwicklung, AI, Blogautor
Über den Autor
Bruno Bouyajdad liebt es, komplexe oder komplizierte Zusammenhänge möglichst einfach zu erklären, damit Menschen, die sich für die Themenbereiche, die er behandelt, einen möglichst einfachen Zugang bekommen. Es fasziniert ihn, sich in diese Welten der digitalen Bits einzugraben und dann Lösungen für seine Follower bereitzuhalten, welche ihre Probleme auf möglichst einfache Weise lösen.
Nach knapp 10 Jahren Erfahrung im Außendienst für Datensicherungslösungen KMU (vor den Clouds) und Photovoltaik, ist er seit über 13 Jahren Webentwickler, mit viel Erfahrung in PHP, JavaScript, WooCommerce, WordPress und Multisite-Netzwerken, auch für Multi-Language-Lösungen. Insbesondere in den Bereichen Plugin-Entwicklung, Theme-Erstellung, Server-Administration und vieles mehr. Er ist auch Experte in Sachen PageSpeed Score-Optimierung und Sicherheit. Dazu kleinere Projekte mit Symfony, VUE, React.
Dazu gehören auch Webdesign, Content-Erstellung, SEO, insbeondere Technical-SEO. Er beherrscht die komplette Adobe Master Suite, hat gute Kenntnisse in C4D, FCPX und Logic Pro.
Seit 5 Jahren begeistert er sich zudem für die Programmierung neuronaler Netzwerke in Python.
Weiterhin teilt er sein Wissen als Blog-Autor, ist begeisterter Fotograf und wenn die Zeit es zulässt, erstellt er hochwertige virtuelle Panorama-Touren, oder schneidet begeistert Videos.
Zudem ist er ChatGPT Prompt-Engineer. Das war einfach Liebe auf den ersten Blick.
In seiner Freizeit beschäftigt er sich gerne mit naturwissenschaftlichen und philosophischen Fragestellungen oder betätigt sich sportlich beim Wandern, auf dem Fahrrad oder im Studio.
